
Jim Wendler’s 5/3/1 for Strength in Sport
Years ago after Jim Wendler finished up competing in the world of powerlifting while training at Westside Barbell he was pretty beat up. They say in strength sports that it’s not a matter of IF you’ll get injured but WHEN you’ll get injured and he was dealing with a lot of nicks and dings from all the time he spent under the bar. He still loved lifting but figured he would focus more on his general health moving forward. The story’s pretty interesting and I’d implore you to BUY his book if you’re interested in learning more about this program. Like the Westside influenced templates we use here at the Lyons Den, 5/3/1 was originally created for powerlifters but if you understand physical preparation for sport then you understand how important strength can be for athletes. This article is going to give you insight into this program, and how it can work for athletes as well!
What is 5/3/1?
To understand how to make this template work for your physical preparation for sport, you’ve first gotta understand the program itself. We’ll start off with a few truths:
You pick three compound movements to stick with for four weeks as your main lifts
You must have a 1RM or at the very least a calculated 1RM for these three lifts
Every percentage run in this program runs off of 90% of your 1RM
This program works off of a progressive overload
You MUST stick to these percentages, there’s no “I’m feeling really good today let’s go heavier”
Your top set is always an AMRAP or As Many Reps As Possible set to failure (repeated effort work)
This template is pretty straightforward and in order for it to work, you HAVE to stay on plan. Like I said above, there’s no deviating from these percentages because you’re “feeling it” today, and you MUST run your percentages off of 90% of your 1RM. I’ll explain how that works below:
To make the math easy here let’s say that you can bench press 100lbs. That is your one rep max, but for the sake of this program you’ll use 90% of that load due to the fact that you’ll rarely be 100% every time you step foot into the gym. This program takes some liberties when it comes to your physical readiness which can change on a day to day and even hour to hour basis. It assumes you won’t be at 100%, and it’s absolutely true so take it to heart and don’t run your numbers off of 100% of your max.
So in this scenario your bench press max will be 90lbs. Your warm up and ramp up sets will be based off 90lbs being your 1RM. For example here i’ll give you your week 1 working numbers:
65% of 90lbs for 5 reps - 58lbs which we will round up to 60lbs
75% of 90lbs for 5 reps - 67.5lbs which we will round up to 70lbs
85% of 90lbs for AMRAP - 76.5lbs which we will round DOWN to 75lbs
We’ll go over loading later on in this article but just understand that you’re working off of 90% of your 1RM, not your 1RM.
5/3/1 works off the repeated effort method. If you’re familiar with the conjugate or a Westside influenced template then you understand and know this method. If not no worries as I’ll explain in this next section.
The Repeated Effort Method
I’ve written extensively here on theLDSP.com about the dynamic effort and the maximal effort methods but have yet to really do a deep dive into the repeated effort method, and it’s absolutely not because it isn’t a great method! It just gets overshadowed by the other two when it comes to physical preparation or written off as “accessory work”. There’s some science behind it and we’re going to dive into that here.
The repeated effort method is GREAT for work capacity development, and is also incredibly useful for hypertrophy (growth of the muscle cell). Repeated effort work in its truest form is doing work at a specific percentage to failure which is right in line with 5/3/1. It allows for the following:
Sarcoplasmic hypertrophy
High volume work will create an environment where our bodies will adapt by creating more substrates within the sarcomere including more ATP, more fluid, more mitochondria, etc.
Myofibril hypertrophy
If done in the right percentages high volume work will create a ton of damage to the muscle cell. This damage will be recovered from yielding larger protein structures in the muscle itself.
Strength development
High volume work done to failure (in the proper environments with the proper loads) will force the body to recruit and exhaust every muscle fiber possible. AMRAPS can be seen as an “extra” max effort lift when taken to a true failure.
Work capacity development
High volume work will lay the foundation for legitimate gains in strength and allow the muscle to become more durable!
Louie explains the repeated effort method in Westside Barbell’s Book of Methods (although it’s somewhat hard to understand if you don’t have a background in exercise physiology), and lays out the reasons as to why the repeated effort method is a legitimate way to train for strength (when used as part of a conjugate system). In layman’s terms, forcing the body to recruit and exhaust every muscle fiber possible by taking this work to failure creates an extra “rep” of max effort work. That last rep is like performing a 1RM, and you’ll get the benefits of performing a 1RM. It seems pretty unbelievable if you don’t have an understanding of exercise physiology, however rest assured that the science checks out due to the size principle.
The repeated effort method is somewhat of a doubled edged sword in the sense that it uses loads that aren’t overly high (perceived danger), but it does force exhaustion which can lead to us getting out of position and getting hurt, or cueing bad positioning on the field of play. Take that for what it’s worth and make your own decision but I will leave you with this: If you want to get stronger you’re going to be put in dangerous positions, period. And in my experience guys get hurt way more often performing high volume work than they ever do performing a 2-5RM. Having a qualified coach who can make sure you’re staying in position is important when you’re doing AMRAPS and repeated effort work.
5/3/1 Exercise Selection for Main Lifts
So we’ve covered the fact that we’re going to be performing AMRAPS as our top sets utilizing the repeated effort method but what about exercise selection? While exercise selection for our main lifts is pretty important don’t lose sleep over it. In my opinion our best bet is to pick one of the following from these three categories:
Bench Press Variation
Close grip, board press, standard bench press, dumbbell bench press, incline bench press, etc
Squat Variation
Box squat, front squat, barbell squat, goblet squat, etc
Deadlift Variation
Hex bar, RDL, standard deadlift, etc
I’ve found these movements to be the best to operate within, leaving the olympic lifts out of the equation. I’ve worked in programs that have used olympic lifts within a 5/3/1 template and to be completely honest I’ve found it to be disastrous. High rep olympic lift variations are stupid, the chance to get out of position within these movements is already high, and it only gets higher as we get near exhaustion. In addition to that, these movements are meant to be done with high bar speed, and you cannot be fast when you’re nearing exhaustion. You cannot change my mind on this one. The three lifts I’ve listed above are great because we can develop strength in pushing, pulling, hinging and squat patterning. There’s nothing left to be desired from this perspective and choosing from these variations of the power lifts will yield the highest bang for your buck. So do yourself a favor, and pick one variation from the big 3 and stick with it.
Loading Parameters for 5/3/1
We’ve talked about utilizing 90% of our 1RM when determining load for our main lifts, but how do we get there? The chart below shows you the percentages we’ll be working off of for our ramp up and top sets. As always, you need to warm up to the movement so get your low volume warm up sets in before you hit 50%.
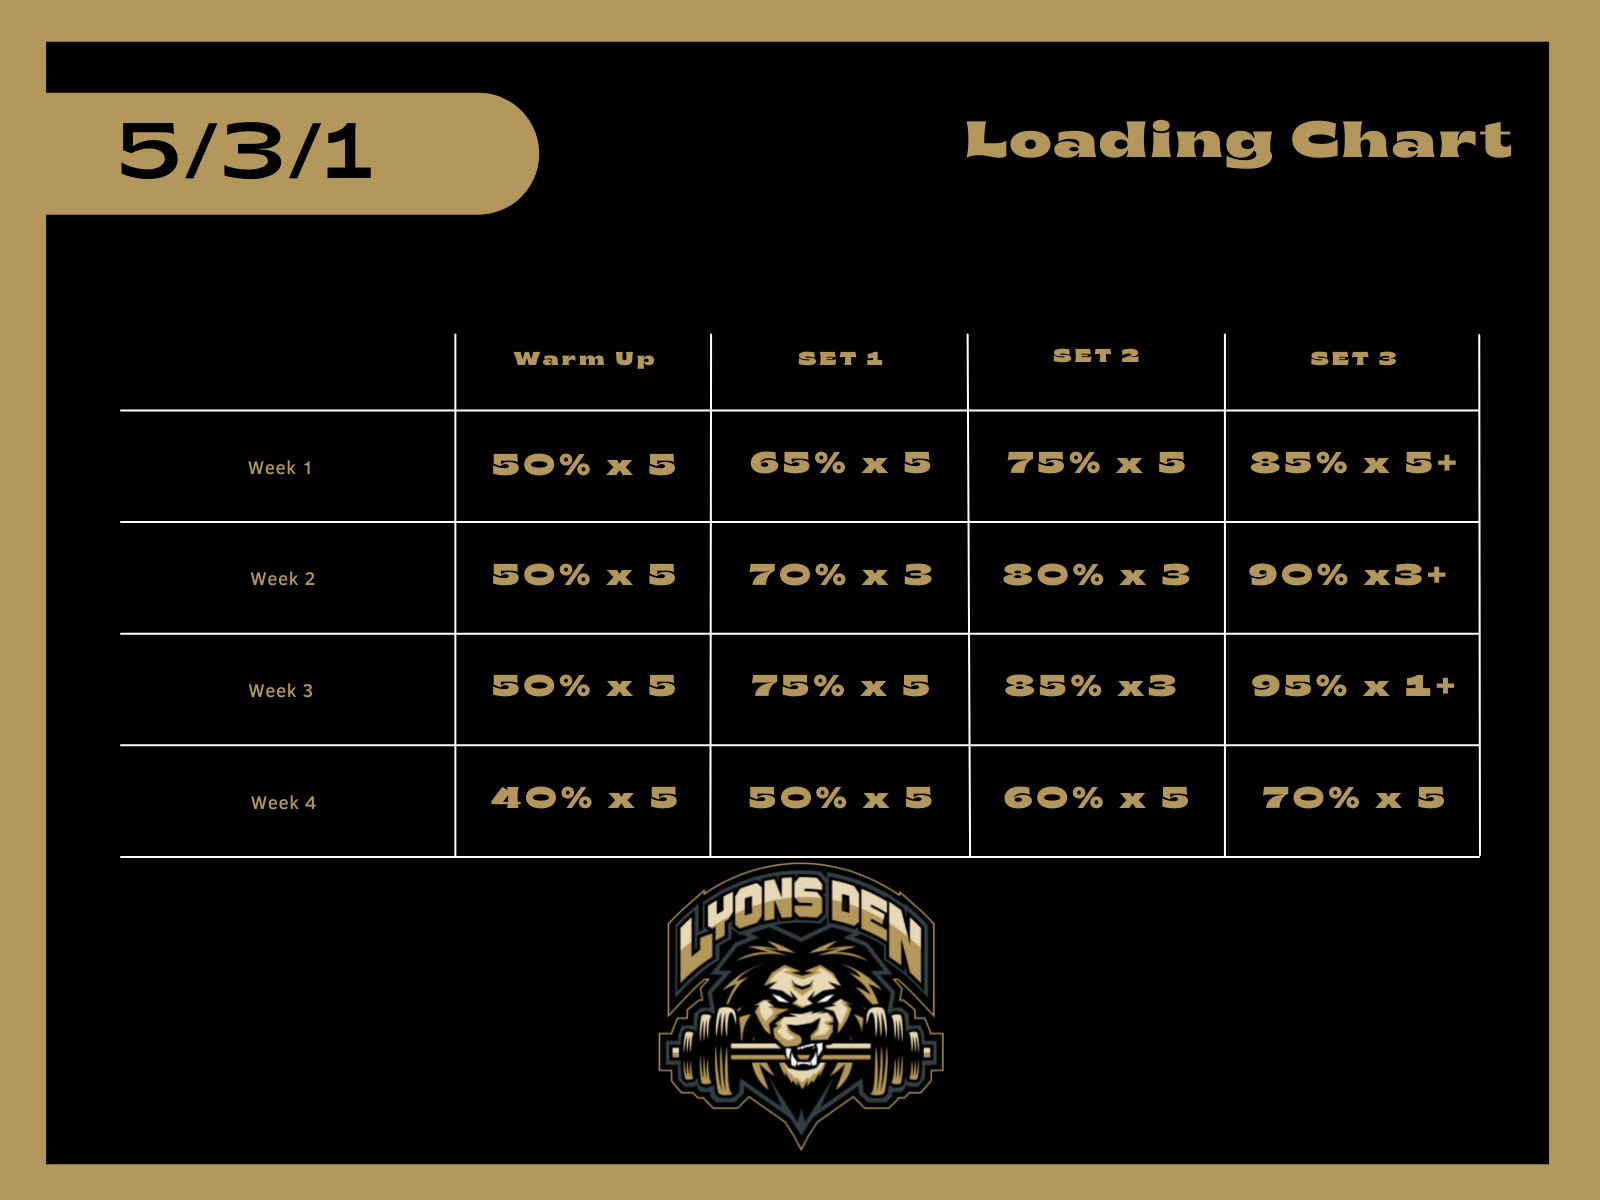
The above graphic gives you everything you’ll need for your working sets. Set three has a “+” sign after the number and all that means is that it is an AMRAP. 5+, 3+, 1+ all mean until failure be it mechanical or physiological.
Warm Up Sets
This is anything below 50%. If you’re a heavy lifter you’ll need to spend more time below 50% warming up, obviously. Think about it this way, a 500lb squatter has a lot more ground to cover before hitting 50% than a 100lb squatter will. Use your best judgement when loading warm up sets and make sure you give yourself ample time to warm up to both the work and the movement itself. There’s no focus on bar speed here, just make sure you nail down your bar path with these sets because once we hit 50% we’ll shift our mindset to have more intent with our movement.
Ramp Up Sets
This is where we begin to get a little bit more dialed in. We now let the load on the bar dictate our bar speed. If you’re a 500lb squatter, you’ve gotta put 500lbs into every rep moving forward. This will cue the CNS to start to recruit muscle fibers with the intent of moving something heavy. This step is vital, and if we do not perform ramp up sets in this manner we’ll inevitably be leaving reps on the platform and not get everything we want out of our top set. Think of ramp up sets as moving submaximal loads with maximal intent, which will ready the body to get the most out of your top set. There’s also a training effect to moving weight in this manner, so you’re getting a lot of bang for your buck here.
Top Sets
This is where we perform. You’re going to be performing this movement to a mechanical/physiological failure so be prepared to suffer a little bit. This isn’t a “I’m tired so I’m failing” thing, this is a “I literally cannot do another rep in a good position and the bar won’t move anymore” kind of failure. Don’t pull the chute and tap out early! Get in there and suffer.
The above sets are important, and need to be treated that way. Don’t plan on showing up for your top sets after half-assing your warm up/ramp up sets because it won’t happen. You can’t show up at half time and expect to play definitely applies here.
Performance in Top Sets
Now that you’ve got a better understanding of our warm up/ramp up/top sets, let’s take a look at what our top set volumes should look like. In my experience you’ll typically blow right past what the “science/data” says you should get if you have any level of work capacity. Since we’re working at 90% of our 1RM, we never even flirt with max effort intensities and this typically yields much higher than expected volume. Below are the actual percentages that we’ll be working at since we’re running everything off of 90% of our 1RM:
85% becomes 76.5%
90% becomes 81%
95% becomes 85%
Below is what typical volume based on percentages should look like
85% = 6 reps
90% = 4 reps
95% = 2 reps
Now since we’re running this off of 90%, this is what it will look like for your training:
76.5% = 9-10 reps
81% = 7-8 reps
85% = typically 6 reps, possibly 5 if you have very low work capacity
When we’re taking into account that physical preparedness changes day to day, and even hour to hour plan on your volume being somewhere in-between the former and latter, but your goal is to BEAT those numbers. I’ve seen kids hit 15-18 reps at their 85% for 5+ reps (this is usually due to incredibly low training ages, which is another topic completely) so try not to put too much stock into what the volume should be. The above numbers are just there so you’re not flying blind and to give you an understanding that your numbers may be off if your percentages aren’t where they’re supposed to be.
If your numbers are WAY off of these, then one of two things may be happening. If they’re low you’re probably waaaaaay under recovered (take a look at your sleep and eating habits), or if you’re way over performing it may be time to retest to ensure we’re training optimally. While there’s still value in training to failure at lower percentages, if you’re getting 20+ reps then your numbers aren’t updated enough. Retest and start back from week 1.
Accessory Work and Finishers in a 5/3/1 Template
Once you get through your main lift it’s time to do the work that’s going to help drive up your lifts and keep you healthy on the field of play. With my athletes this is where we focus on pulling for the upper extremity, and focus on the posterior chain and train on one leg for the lower extremity. There aren’t really any rules when it comes to accessory work, your movements should be catered to what you need. Need stronger triceps? This is when you hammer them. Need to work on your balance? Get on one leg. Shoulders lacking? Perform overhead movements here. Are you protracted and forward rounded? TONS of horizontal pulling should be included.
The bulk of your work should be done with higher volume (8-15 reps), should be compound movements (more than one joint), be used to fill gaps in your off the field needs (injury prevention), and should also consist of movements designed to help drive your main lifts up. Your needs and imagination are the only rate limiting factors here. Pick 4-6 movements and progressively overload them over the weeks.
Finishers can also be included in this space. Finishers consist of high volume, low intensity movements done for volume. Think push up variations, inverted row variations, bicep curls, tricep extensions, forearm work, etc. These finishers are designed to keep the athlete moving from exercise to exercise until all the work is done. Here’s an example of a finisher for the upper body:
Push Ups - 50 reps
Swiss Bar Inverted Row - 50 reps
Band Tricep Ext - 75 reps
EZ Bar Bicep Curls - 40-50 reps
The above movements won’t destroy you, and they’ll leave you with a solid pump. You don’t do one set of 50 push ups, you just have to finish 50 push ups over the course of the finisher. So you could do 20 push ups, then hit 15 inverted rows, then 20 tricep ext and finally 15 bicep curls before going back to your push ups. Take each “set” you perform to near failure and move onto the next movement. You just have to chip away at the total as you go through what is essentially a circuit. Over time you’ll be able to perform more reps each time and finish the finisher quicker. Once that happens it’s time to rotate to new movements or increase the volume.
For the lower extremity finishers I like to include a lot of sled work, loaded carries, light weight goblet squats and bodyweight lunge variations. Think of this as a space that’s essentially conditioning with relatively high volume. You can create circuits with this work as well, although I wouldn't program for total reps the way I do for the upper extremity. Here’s an example of a lower body finisher:
Sled Drag x 20 yard
Sled Push x 20 yard
Farmers Walk x 40 yard
Bodyweight walking lunges x 15 each
You can perform this for 2-3 sets and over time build on the volume and/or the intensity as you move forward throughout the weeks. I tend to be a bigger fan of increasing the load over the volume, but you need to do what is best for yourself or your athletes. If you really lack work capacity then focus on a volume progression and if you really lack strength let’s focus on a load progression. This work will more than likely leave you feeling exhausted and that’s ok, but it shouldn’t leave you feeling broken.
Is a 5/3/1 Template for You?
That question can only be answered by you! I will say it can be great for a team setting because it’s incredibly hard to have 15-25 athletes training at 15-25 different loads/volumes when you only have 4-6 racks/benches. This can take a lot of the guess work out for you as a coach and more importantly for your athletes. If you’ve ever had to answer 15 questions about load from 15 different athletes in the gym you know what I’m talking about. It’s great for beginner strength, it can be great for stepping back from higher intensities, and its a boom for work capacity development. It can be great for training optimally due to the AMRAP/Plus sets, you’ll always do exactly what you’re capable of on that given day. It can be great for a low intensity block, or a high volume/work capacity block.
This is a hard template to run during your season, but it’s still possible if you control the right variables (mainly the volume throughout the rest of your training sessions). I like to utilize this early on in someone’s training, when they first come in to see us after running a basic progressive overload for a few weeks to a month. It gives you plenty of work with the different squat/bench/deadlift variations so you’ll be able to master them in a shorter time frame. It’s great for practice with the main lifts. It allows you to learn how to suffer in training, which while we don’t ALWAYS want to do that there are times where it’s necessary. It creates great localized (and even systemic) work capacity which will allow you to really take advantage of your higher intensity blocks where strength is the goal, and as an added benefit higher work capacity allows for better recovery.

About the Author
Connor Lyons is the owner and director of strength and conditioning at The Lyons Den Sports Performance located in Wesley Chapel, FL. He can be reached at Connor@theLDSP.com